
To say she was thrilled to have said balloon, wouldn't be a strong enough expression of her enthusiasm. Seriously. She dubbed it "her friend". It became her constant companion until she left for mommy's house a couple of days later. 'Okay then' I thought, 'a balloon themed party it shall be!'
This posting then, is about the preparations we did, the things we made, ahead of time, for her Balloon Themed 3rd Birthday Party.
Part #1 - the invites
Here is a picture of the supplies used -

This picture is of how the supplies were used, to make the covers of the invites -

The inside of the invite, listed details about the party. Directions to the party, were printed on the back. I had used the computer and printer for both of those steps, before doing the fronts.
Part #2 - the Ribbon Wreath
I had found the idea for it on pinterest (this pin). The pin had originated off of the blog 'Everyday Celebrating' (THIS particular posting).
When we got to the 'Dollar Store' they didn't have very many curling ribbon packs in stock. 'Okay then, instead of doing it only in the primary color ribbons like I had seen, we'll change it up a bit. Let's see... it is for Analyse, and she does love the color pink...'. I was also able to pick up the swimming noodle to use as the base, at the Dollar Store. However, they didn't carry the metal pins to hold the ribbons in place, but we were able to get them at Hobby Lobby(R).
One of the reasons I wanted to make the wreath, was because I felt it was a project Analyse and I could do together. We did.
Step #1, was to measure the wreath to the size I wanted. See, Brian and I had recently stopped at Kingma's Market(R). While there, I had spotted the wooden cheese crates they had for sale. 'Those would be perfect for storing wreaths in.' We bought one, for under $2.00! I need to go back and get another 'one', at least o:-D
The idea to use a swimming noodle as the base, came from this pin. Which had originated from the blog, 'The Art of Doing Stuff' (THIS particular posting).

Step #2, was to tape the noodle to form a wreath.

While I was getting the ribbons free of the cardboard they came on (something I highly recommend doing ahead of time, like when the kids are napping), Analyse decided to try the wreath on for size.

Silly girl.

A look at the various ribbons used.
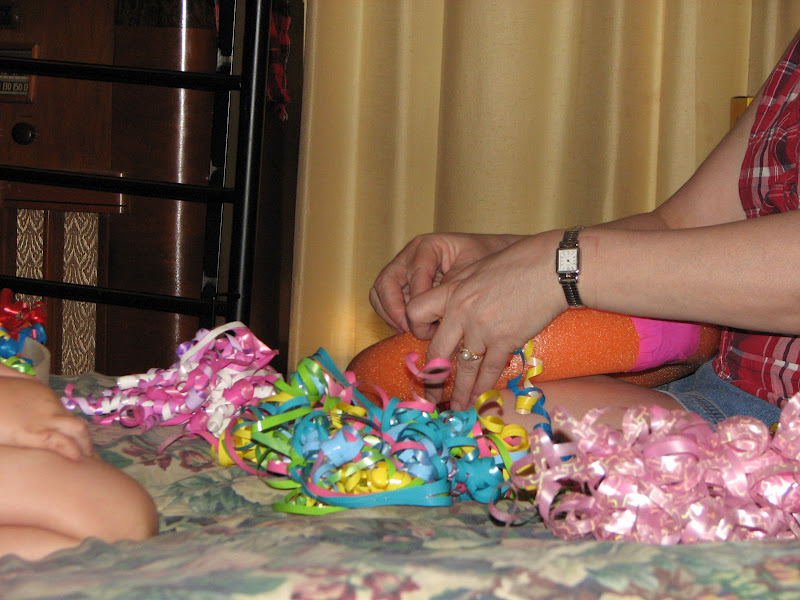
I put the pins in, she pushed them down.


and

The finished wreath.


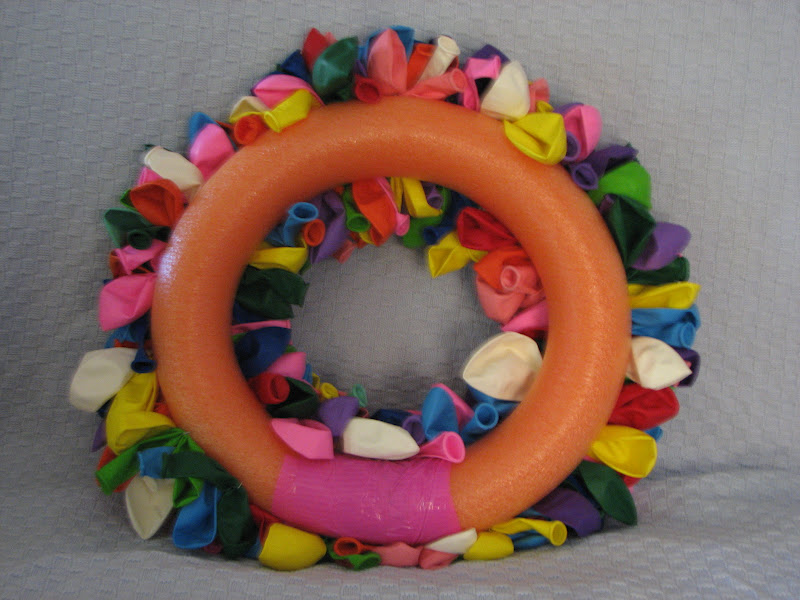
Part #3 - the Balloon Wreath
This one too, was an idea I had found on pinterest (this pin). The pin had originated off of the blog 'The Creative Homemaker' (THIS particular posting). I had ended up needing to pick up the large packages of the balloons at both stores too, due to low supplies were at the first. I used less than half of the amount of balloons the original blogger had used, and about 3/4ths of the swimming noodle.
Step #1, was to separate the balloons. Having learned my lesson while making the ribbon wreath, I did the first couple of steps during nap time! (:->)

Step #2, was to set the balloons up in the order I wanted to use them. (in other words, making sure I'd get a good combination of the colors, without loosing track of what I'd used last, and without having to dig through the bag to look for the color I wanted.) Turned out to be a good plan!

This is a close up of the baggies of balloons.


I had also thought that sitting the balloons up the way I had, would help teach Analsye working in patterns, working her way down the row, handing me one from each container in progression. Turned out that was still a bit too deep for her to grasp yet. No big deal! Just had to change where I sat.
Step #4, Analyse handing me a balloon.

Step #5, Align the balloon and start the pin into the swimming noodle. Analyse would then push it the rest of the way in.


One small section/area done.


Finished.
From the front -


Part #4 - Jelly Bean Bracelet's
While we didn't want to do large sized "goodie bags" or some such for our guests, I did want to do 'something'. I wanted to have a little something that Analyse couple personally give to her guests, as though she was giving them a present. I had a bag of Brach's(TM) Tiny Jelly Bird Eggs left from Easter, and the idea I had seen for making bracelets out of them kept coming to mind. I figured it would be a simple little project to tackle.
I couldn't find my original pin for this idea, so I searched for and found said pin. You can see it here. The pin had originated off of the blog ''My Kids Make.. And Yours Can Too' (THIS particular posting).
Here is a picture of the supplies I used.

I had picked up a spool of stretchy thread at Wal-Mart(R). While it worked great in aiding the bracelets onto adult sized arms, it didn't like to stay tied in tight knots. A couple of drops of Super Glue(R) directly on the knot itself worked wonders! :->
And getting the needle to actually go through the jelly beans, took a bit of trickery and effort! I used a wet wipe to clean the needle off between jelly beans. And I chose to only put a few jelly beans on each individual bracelet.
Wrapped the finished bracelets in a small piece of tin foil. Taped them closed. At the party I walked Analyse around the group, having her hand them out. She seemed to really enjoy doing so!
She had passed them out before opening her own gifts. Here she is still wearing hers while opening gifts.

Part #5 - Balloon Paddle Ball
I wanted some type of a game that EVERY-body could participate in. But what kind can you do, besides board games, that both great grand parents as well as three year old's will enjoy playing? I found just such an activity. Yup, yet another wonderful pinterest idea :->. (THIS pin). I can't give credit beyond that, because when I click on the picture itself, a warning comes up, saying that it's trying to redirect me to a site which might have inappropriate contents..... . I choose to go back to pinterest!
I used Elmer's(R) glue to attach the wooden paddles onto the cardboard backed paper plates. But it wasn't taking real good. So I pulled out my roll of pink duct tape and applied some of it to each paddle. The next morning, after being allowed to dry overnight, they were connected but good! :->

The last "ahead of time preparation" which had to be done, was the cupcakes. I made the cupcakes themselves using the same Chocolate Cake Recipe that I had used for her birthday cupcakes the previous two years. You can find the recipe for both the cake and the chocolate frosting HERE. The 'Balloons' are M+M's(R), laying upside down. And I cheated and used gel tube frosting for their strings.

This concludes part 1 of Analyse's 3rd Birthday - Preparations for the party.
Coming soon in a posting on this site -
part 2 - Decorations at the party
part 3 - Fun at the party
{ As always, you can see any of the pictures larger by clicking on them }
No comments:
Post a Comment
To those of you leaving us positive comments - THANK-YOU!!! We really do enjoy them!!!
A change has been made in how your comments are processed. They are now sent directly to the blog owners. If your comment made them smile, it will *eventually appear on the blog. [* depends on when we're on line next]