We have had lots of struggles and challenges in our lives, but we've had even more blessings!

Thursday, November 7, 2013

fixing the structure of our front porch

   I've told you about cleaning the walls of our front porch, and about scrubbing down the steps, all of that happened after the guys had fixed / rebuilt the structure of our front porch.
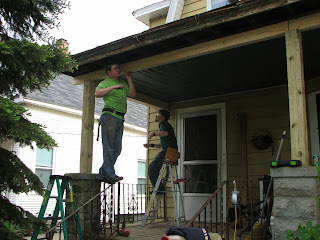
   I was going to add a picture of what our porch use to look like, but I couldn't find one in any of the files currently on this computer, probably have one in a box some place... you'll just have to look at this picture and imagine the whole porch this way - 
                                                             (June 2013 picture #2)

    For the record, I had never liked the way our front porch looked. Not from the very first time I drove by the house and saw it. But changing it was never a 'hit the budget' worthy priority. So I "lived with it". Glad that's over. o;-p

    Way back when, when we had bought this house from our friends we were renting it from, we had had to paint the porch roof due to FHA requirements. Over time, the ceiling at the door end of the porch had started peeling, but not the other end. 'Maybe it's due to the porch getting hit with direct early morning sunlight and the trees protect the porch from mid day heat', we had thought. Maybe that was the reason, not sure, but then the situation got worse. The ceiling at the door end started leaking. Not good! And it spread, closer and closer to the house. We decided that we better get to it this (now past) summer, find out what/where the problem was and fix it, before we had one heck of a Michigan winter and had ice build up in there, or even worse, have it spread into the house itself.
     We found the problem okay. YIKES! This is what was hiding underneath that white aluminum siding trim work.
                                                                   (picture #004)

     zoom in,
                                                                      (picture #003)

     and closer,
                                                                  (picture #005)

      and after removing one section,
                                                                  ( picture #007)

    Turned out, that the rotting away of the inner pillars was to such an extent, that the post at the alley end of the porch was this height, the middle pillar was three (3) inches shorter and the pillar at the door end was yet another three (3) inches shorter = the door end of the porch roof had decayed to the point that it was six (6) inches shorter than the alley end! Quite a shock!
    Also quite the project to tackle. We started on Memorial Day weekend. Thinking that we would get the whole project done. Between work schedules and the amount of rain we had this year, they finished it up Labor Day weekend. For now. There is some additional trim work they hope to add, next summer.

      They had to completely destroy/remove the pillar at the door end, which meant jacking the roof up a bit and temporarily putting in a support post.
                                                             (picture # 006)

     working on the front edge of the porch roof
                                                        (picture # 10)

     As you can tell by the look on Alex's face (the one on the right), Brent's shirt (the one on the left) says a lot about the attitudes while working - Mischief! (Byron is the one in the middle)
                                                        (picture #008)
    New post is in, adding new edging -
                                                         (picture #13)
                                                       (picture #15)
         and the upper edging - [Brandon is the son in the blue shirt]
                                                         (picture #18)

     The way the project went, work, stop, 'what should we do now?', work ....
                                                       (picture #19)
    'We have to take this apart so that...'
                                                         (picture #21)
     Removing the old (VERY leaky) gutters
                                                                     (picture #24)     
 p.s., I cleaned the mail box when I did the steps too!

     making progress - (Kayla is the girl in the picture, she did a ton of 'can you hand me the...')
                                                          (picture #25)
   oh the temptation o;-p
                                                                (picture #027)
      This is what the porch currently looks like. Yes, right now. I just went out and took these pictures :->
                                               (picture #001 from finished porch 2013)
        and a closer view -
                                                             (picture #002)
     (I noticed that the posts for the bottom railing need scrubbed too. Always something)

      I also got to pick my new porch light :->

      I had always thought our house looked quite a bit like a barn, so that's the style we're going for.

  Reminder, if want to see the pictures clearer/larger, just click on them.

Wednesday, November 6, 2013

cleaning the walls of our front porch

     While I had done the floor and steps of our front porch by myself, I had help scrubbing down the walls of it. My helpers were my two GRAND children :->
                                                      (DEEP dish pizza file - #167) 

   First, I showed them how to do it
                                                                  (# 181)

   They were suppose to do the lower section, I would do above where they could reach.
                                                                  (# 170)

   Yes, both 4 year old Analyse and 2 year old Elliot actually helped scrub!
                                                                   (#171)

   dipping the scrub brushes into the bubbly water (I used blue Dawn dish soap) was a lot of fun too
                                                                    (#172)

   'Maybe I should clean this too' :-p
                                                                            (#175)

    Splashing in the over spill was fun, dipping our hands in the bubbles was fun...
                                                                       (#177)

   Later he lost interest in the scrubbing, spilled his bucket, and had a blast playing in the water. Loved hearing his laughs of delight.

     She did a GOOD job! She took her task of helping very serious and I ended up needing to go over very few spots of what she had done. Impressive! :->
                                                                (#184)

     We had done a section, then I would use the hose to rinse it off. Repeat. Repeat. Repeat. They of course, wanted to use the hose themselves. I had raised their daddy and his brothers and thus knew that this could get out of control in no time flat. So I had kept the spraying rights to myself. Oh the squeals of delight when unannounced, I had sprayed their feet. That evening, after both daddy and papa were home from work, we invited them out to see what we had accomplished, "But we need to go out one minute before you do". The sparkle in Brian's eyes told me he knew what I had planned and he was willing to play along.  When we yelled "okay", papa came out. We were standing on the far end of the porch. I started talking about what we had done and pointing. As he was looking at the walls, the kids started to run towards him while talking. I tried to subtly call them back. Thankfully, he is a very good sport and helped send them back to me. While he turned to again look at the wall, I placed the hose nozzle in Analyse's hand and whispered for her to spray papa's bare feet. With giggling delight she did so. Papa 'screamed' and jumped. Elliot needed no encouragement to take his turn. ;-p

Tuesday, November 5, 2013

Our front steps

   One day this summer, I went to sit down on the steps leading to (or from) our front porch, but I didn't, because when I looked down at them, they were just to gross to sit on.  So was the porch itself.*
                                                       (deep dish pizza file, #225)

    Action was needed ! 
    I remember reading how you shouldn't use bleach on wood porches or decks, that it wasn't good for the wood nor the environment. So instead, I started with an ice cream bucket of warm water, a scrub brush and lots of  blue Dawn dish soap.  While it did make an impact, the steps were in such a sorry state, that it wasn't getting all of it. 'Hummm... I don't want to spend weeks on this'. 
   Then I thought of all of the various things I'd seen on line, about using a combination of blue Dawn dish soap and Hydrogen Peroxide. 'Well (I thought), I know that Dawn is good for the environment, haven't a clue if Hydrogen Peroxide is, and not sure about either one on wood, but something has got to be done about these steps and I am in the mood right now to start on them..'. So I refilled the bucket. This time I put seven (7) swirls of the blue dawn dish soap in the bottom of the bucket, started adding warm water and while it was filing to half way full, added the equivalent of two (2) Tablespoons of Hydrogen Peroxide. 
    The scrub brush I was using, has a handle curved up from the base of it. It makes for a wonderful scrub brush, because there is a variety of ways you can hold onto it. 
     I could see how much more effective the combination of the two products was, within just a couple of swirls of the scrub brush!  I literally giggled with glee! (The * above, is due to the fact that I thought to take this picture the day I started on the steps, after having already done the wood from the front door to the steps.)
     Due to still being 'Ms. Vertigo', the overall project took me a week to complete. I tackled one step a day. Scrub it down, rinse it off with the hose, go sit and regain my equilibrium while it dried out, go out and double check it, usually decide that one more go at it would be a good thing, tackle it, and then go sit for the rest of the evening (o:-p). But it was worth it!  This is what the  steps looked like when I was finished.
                                                  (front porch and tree, picture #001)

     As you can tell if you look at the edge of the porch to the right of the steps, once I was done with the steps, it became all to obvious how bad the edge of the rest of the porch had looked, so I ended up cleaning it to (before the picture was taken).  Then I cleaned the railing down the other set of front steps.  Several weeks later, I cleaned the whole back porch too. The projects took a lot of elbow grease, but to this day, I smile when I see the finished results. :-]

Monday, November 4, 2013

the tree had been my friend

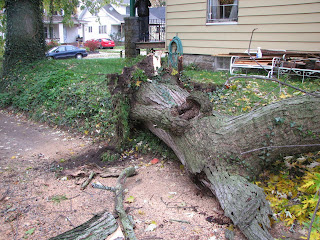
    At 12:10, while I was talking to Brian on the phone during his lunch break Friday, I suddenly heard this loud boom/thud type noise. I rushed and looked out the front door, but saw nothing. 'Weird'. Not ten minutes later the phone rang, it was my neighbor Chris. "Have you seen your tree?" "Which tree?" "The one along the alley" "I head something a few minutes ago and looked out the front door, but didn't see anything." He chuckled and told me to come to my door. "Which door?" "Your back door". I did. Chris was standing on the little platform next to out small porch, looking towards the alley. I stepped out beside him, and gasped. I guess the noise I had heard, was the trees tap root snapping.
    This picture was taken while I was standing near our parking spots in the alley.
                                                      (F.P. + Tree 202)

     The tree had literally uprooted, the extreme strong winds we had had the night before had been it's literal down fall.
                                                (F.P. + Tree 203)

    I told Chris to stay there a minute and I rushed in and grabbed the phone. Chris thought I was calling the neighbors, who's parking spot the tree was 'too close for comfort' to. Nope, I was calling Brian. He only had 5 minutes left of his lunch break. "The tree fell... .. ... I need you to come home!"  I had awaken with quite a migraine that morning, it hadn't subsided much and I was very fuzzy brained. Dealing with all of the phone calls that were going to need to be made, figuring out how to get this handled without costing us a fortune... I needed help.
    While Chris went to personally tell the other neighbors, I started moving stuff to block the alley. There was no way I wanted somebody who cuts through our alley, deciding that they could fit under there and end up having a bigger problem on our hands. 
                                                      (F.P. + Tree 205)

    We moved the neighbors car safely out and into our then empty parking area. When Brian got home, he called Consumer's Energy while I called our home insurance company.  The power lines were barely above the neighbors garage roof. The lady at the power company said that she was going to list them as laying on the roof, that would move it up the priority list. We knew that in reality, it wouldn't be long before they were! Brian then called the city's non-emergency number. While talking to the guy he suddenly realized, 'I know that voice'. "Mary?" "Yes sir, my name is Martin D.... " "It's Brain B." Marty was going to send a fire truck by, "just to double check everything".  "Does he remember my aversion to fire trucks?!!" I asked Brian. He chuckled. 
    While looking the situation over, one of the firemen turned to Brian and said, "Somebody was looking out for you, if those two wires had been pulled together, instead of separated when the tree landed on them, they would have most likely started a fire." While we hadn't yet realized that part, we had known God had spared us greatly. If the tree had leaned towards the house instead of the alley, there would have been great damage. If the tree had broken apart while falling over, the neighbors car would have been totaled. If somebody had been driving through the alley at that moment... . THANK-YOU LORD!
                                                       (F.P. + Tree 204)
                                                        (F.P. + Tree 206)

    The Firemen had gotten out their yellow tape to tape off the area, but then decided that the blockades I had put up would probably be more effective. :-]  

   More of the base of the tree. 
                                                      (207)
                                                           (208)

   Consumers Energy was there so fast we were really surprised!
                                                                 (209)
                                                           (211)
                                                  (212)

    They got all of the tree onto the ground.
                                                         (214)
                                                            (213)
                                                                      (217)

     Then they left, stating they had notified the city that they needed to come do the clean up. We hoped they wouldn't wait till Monday. We were amazed just how fast they showed up. A couple of big trucks, one puling a trailer with a bob cat on it.
                                                                (220)

     Brian came in for a bathroom break and they had it done before he got back out. As they were lifting one big piece into the back of the truck, we saw just how rotted the one branch of the 'Y' in the tree has been, yet the other branch of it was totally solid. 
    All in all, from the time it fell, to the time the city left (only leaving some leaves for Brian to sweep out of the neighbors parking area), less than an hour had passed. WOW! 
     I titled this posting "the tree had been my friend". The shade it had provided our house over the years, had been greatly appreciated! I fondly remember the numerous years of baby squirrels chatting at us through the living room window, from their home in the knot of the tree. I also fondly remember the mother goose who had built her nest in the broken off branch of the one part, one year. I don't remember what year that was, but I know I had posted about it... o:-p. The grown squirrels had still loved to jump from the branches of  the tree and loud with loud "Thumps" on the roof, directly above my bed, early in the morning, and then again numerous times through out the day. Very often, there would be at least two loud thumps and then a game of chase would begin.  The squirrels also loved to sit in the tree and watch my GRAND children play inside. The GRAND children liked going to the window and talking to the squirrels.
    Wish it didn't take so long for a new tree to grow next to that spot!

Tuesday, September 17, 2013

The Bz's D-E-E-P dish pizza

   Years ago, I started making our pizza's from scratch. Feeding 5 guys (and often others) ordered out pizza, was just not budget friendly! I did it for many years. Then I tapered off. Many reasons as to the 'why'. The guys have been after me to start making it again, which I find comical, in part, seeings how a couple of them do make it themselves, using my recipe. Not only have they been wanting me to make homemade pizza for them, but they really want the 'deep dish' kind. And always, they have added (with smirks) "This time, make it  r-e-a-l-l-y  deep!"
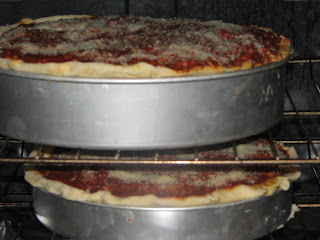
   It was decided that this now past Sunday, we were going to do a birthday dinner. Brent's (much belated) and Benson's. What to fix for dinner that both of those two would think was a meal specially for them?! Quite a quandary, I tell you. Then the idea hit, make homemade pizza. But not just regular pizza, because to make enough to satisfy the whole group, It would take three batches, of only two in the oven at a time... so make deep dish ones. Then with an audible giggle, the idea came to use my huge wedding cake type of pans as d-e-e-p  pizza pans. :->  
   The next quandary was for a dessert for those two. Another idea came that was such a hit! But that's another posting.
   I had posted this on my Facebook wall Sunday morning - "Headed into the kitchen to start prepping for tonight's family dinner, celebrating Brent's ( a 'bit' belated) and Benson's birthday's. I'm concocting my own version of a much loved 'dish'. Here's hoping it turns out.... In hopes that it does turn out as a "keep it" recipe, I'm taking both notes and pictures as I go..."

                                              The B'z  D-E-E-P dish pizza -
                                                          -picture of finished pizza - 

From my notes -
1st step - send Brian off with a shopping list. Did that Sat. evening. Thanked both Brian and God that he added a few things to the list, especially the eggs and butter I hadn't thought to add, but needed for the dessert! 

2nd step - Making the SAUCE -
Dump the following into a large crock-pot -
1 - #10 can (6 lbs 10 oz) GFS Tomato Sauce 
1/2 cup grated REAL Parmesan Cheese
1/4 cup dried Parsley Flakes
1/8 cup (dried) Leaf Oregano
1/8 cup (dried) Sweet Basil Leaves
1/2 cup (dried) Minced Onion
1/4 cup Garlic Powder
1/8 cup Granulated Sugar
1 Tablespoon Salt
1/2 teaspoon Pepper
1 Tablespoon Mild Chili Powder
                                                             whisk it together.

Plug crock-pot in, with lid on, and cook on low for 4 hours or so.

3rd step - Open and set to draining #10 can (4 lb 4 oz = 68 oz total) Mushroom Stems + Pieces

4th step - brown the Sausage.
Heavily spray electric skillet (or whatever skillet you use).
   Use kitchen shears (LOVE them!) on sausage logs. Place logs in skillet. Chop logs in half lengthwise.
then again, and again... then switch and start the other direction (the width of the pan). Chop away until all of the meat is in small pieces. 
   Scoop meat away from one end of the pan and spoon out excess grease (NEVER dump it down the drain! It will eventually create horror clogs in your drains, and if you have septic tanks... it results in huge expensive problems! Use previously emptied and rinsed out metal cans. Store them in your freezer till the morning of trash day.)
   Dump finely chopped out sausage onto a cookie sheet lined with 3 layers of paper toweling. Set aside.

5th step - re-spray and re-plug in the electric skillet. Cook Bacon.
2 packages (3.5 lbs each) Naturally Hickory Smoked Thick Sliced Bacon (from Sam's Club
When pieces are done, lay them on another triple layered paper towel covered cookie sheet. Set aside. When cooled a bit, chop into fine pieces.

Steps 5 and 6 can easily be done simultaneously.

6th step - Peppers. I used red, orange and yellow ones.

core them, remove all the seeds, cut into thin strips and then into small pieces.
                                                                   so-o pretty -

      What I didn't do this time but WILL do from now on, is to roast them first. Not doing so, resulted in a lot of liquid in the finished pizza. Next time I will roast them first and let them dry on paper toweling like I did some of the meats. Live and learn. 

7th step - the DOUGH.
   I copied this recipe out of a thin, non hard cover cookbook, titled "Italian Food Cookbook" that I don't remember if I had received as a shower or wedding gift, or if I had picked it up somewhere. 
I made 4 times the recipe, but I will be nice and put the single batch recipe here -

1 Tablespoon dried yeast
3/4 cup warm water (186 ml)
2 1/4 cups flour
1/2 teaspoon salt
1 (or more) Tablespoon(s) olive oil

1) Put yeast into a small glass bowl and add the warm water. Allow to stand 5 minutes, then mix till smooth.
2) Measure flour into a warm (sprayed) bowl (I rinse the bowl under HOT tap water for a couple of minutes, let air dry for 1 minute, then use) with the salt. Blend some.
3) Pour the yeast mixture into the flour with one Tablespoon olive oil. Mix with your (sprayed) hands to a stiff dough. If mixture is too dry. add more olive oil, mixing again before deciding whether or not to add even more. Before kneading, let dough sit for five (5) minutes. The recipe then says to knead on a floured board for ten (10) minutes. I usually just knead it in the bowl.
4) Lift the dough out with one hand, respray the bowl, put dough back in, turning it till all sides have some of the spray on it.
 Cover the bowl with light weight dish cloths and place in a draft free spot (the inside of your not turned on oven works great!), until doubled in size (an hour for a single batch, hour and a half for 4 x the recipe).

8th step - can be done while dough is rising. Ham.
Slice half of a large (boneless) ham very thinly. Then chop it up into small bits.
Yet again, place the meat onto a paper towel lined cookie sheet and set aside. 

9th step
                                                            -picture of risen dough -

Spray your counter top with pan coating spray, lightly flour the area, do both to your rolling pin. Take all of your dough if your doing a single batch, or the right percentage of your dough if you did a multiple batch, and with sprayed hands, between your hands, knead it a bit more till it's smooth and elastically. Place dough onto prepared counter top and starting from the middle, rolling out first one direction, then the other, then from an angle, then another angle. Turn dough over and start all over again. Keep doing thus until your dough is larger than the pan you plan on using (hold pan just above rolled out dough to judge size).  Fold dough in half, then half again and place along one edge of well sprayed pizza pan (or whatever pan your using). Unfold dough gently. If your using a deep pan, make sure you get it up and over the sides. Getting it even over the edge of the pan, will help keep it in place better for filling. If you need to stretch it some, start in the middle of the pan and using your finger tips, slowly work the dough towards the outside, stretching a bit as you go. Be gentle! You don't want to rip it and have to patch it. 

10th step - Assembly time - (turn your oven on to start preheating)
Once the dough is in the pan right, let it sit for 5 minutes before you start adding your layers.

LAYERS: Remember, your going to want some of every ingredient in every single bite!
                                    Sauce. (thick enough that your not seeing the dough through it.)
                                                                          Ham. 
                                                                Mushrooms

    [For the record - the larger pizza had the layers of mushrooms and peppers, the smaller pizza did not. Next time I'll be making a third one, with out the pepperoni. It tipped the spice table too much for a couple of us. Pepperoni is not worth heart burn. Period. ]

                                                                    Pepperoni
                                                         
                                                         Another layer of Sauce
                                                   Shredded Mozzarella Cheese
                                                                 Peppers
                                                                     
                                                                        Sausage
                                                                          Bacon
Another layer of Mozzarella Cheese
Add a third layer of the Sauce
heavily sprinkled on Parmesan Cheese

11th step - BAKE
I baked them for 45 minutes at 450 degrees. The bottom crust was a bit tough, so next time I plan on baking them at 400 degrees and covering them for the first 40 minutes. 

Remove them from oven, sprinkle on just a bit more Mozzarella Cheese, put a round cookie sheet upside down on them (to help the cheese melt some) and let the pizzas sit up for 10 minutes or so before slicing and serving.

When asked, the pizza got several thumbs up and a few thumbs sideways. Roasting the peppers first, as well as lowering the baking temp and baking it covered for most of the baking time, 'should' help turn most of the reasons for the thumbs sideways to thumbs up. ;->

The amount of time invested - a lot. Worth it? Oh yeah! Their eyes when they discoverd that the pans contained deep dish pizza were priceless! o:->

No photo shop work was done on these pictures. Yes, some could have used it. Still conquering the mountain of laundry in the basement.

~ ~ ~ ~ ~ ~ ~ ~ ~ ~ ~ ~
I 'plan' on linking this particular posting up to:

  ~ "Making Your Home Sing Monday('s)", are hosted by Nan, at 'Mom's the Word (I love to hear)'  (http://momstheword--livingforhim.blogspot.com/).
  ~  "Kitchen Tip Tuesday('s)", hosted by Tammy, at 'Tammy's Recipes'  (http://www.tammysrecipes.com/). 
 ~ "Tuesday's Tasty Tidbits", hosted by Susan, at 'Permanent Posies / Creative Chaos' (http://permanentposies.com/)
 ~ "Totally Tasty Tuesdays", are hosted by Mandy, at 'Mandy's Recipe Box' (http://www.mandysrecipebox.blogspot.com/).
  ~ "Tempt My Tummy Tuesday('s)", are hosted by Lisa, at 'Blessed with Grace'  (http://www.blessedwithgrace.net/)

  ~ "Full Plate Thursday('s)", are hosted by Miz Helen, at 'Miz Helen's Country Cottage' (http://mizhelenscountrycottage.blogspot.com/).     
  ~ "Foodie Friday('s)", are hosted by "Gollum" (aka: Michael), at 'Rattlebridge Farm' (http://designsbygollum.blogspot.com/)