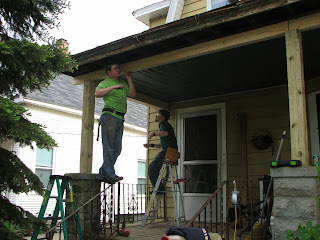
I've told you about cleaning the walls of our front porch, and about scrubbing down the steps, all of that happened after the guys had fixed / rebuilt the structure of our front porch.
I was going to add a picture of what our porch use to look like, but I
couldn't find one in any of the files currently on this computer,
probably have one in a box some place... you'll just have to look at this picture and imagine the whole porch this way -
(June 2013 picture #2)
Way back when, when we had bought this house from our friends we were renting it from, we had had to paint the porch roof due to FHA requirements. Over time, the ceiling at the door end of the porch had started peeling, but not the other end. 'Maybe it's due to the porch getting hit with direct early morning sunlight and the trees protect the porch from mid day heat', we had thought. Maybe that was the reason, not sure, but then the situation got worse. The ceiling at the door end started leaking. Not good! And it spread, closer and closer to the house. We decided that we better get to it this (now past) summer, find out what/where the problem was and fix it, before we had one heck of a Michigan winter and had ice build up in there, or even worse, have it spread into the house itself.
We found the problem okay. YIKES! This is what was hiding underneath that white aluminum siding trim work.
(picture #004)
zoom in,
(picture #003)
and closer,
(picture #005)
and after removing one section,
( picture #007)
Turned out, that the rotting away of the inner pillars was to such an extent, that the post at the alley end of the porch was this height, the middle pillar was three (3) inches shorter and the pillar at the door end was yet another three (3) inches shorter = the door end of the porch roof had decayed to the point that it was six (6) inches shorter than the alley end! Quite a shock!
Also quite the project to tackle. We started on Memorial Day weekend. Thinking that we would get the whole project done. Between work schedules and the amount of rain we had this year, they finished it up Labor Day weekend. For now. There is some additional trim work they hope to add, next summer.
They had to completely destroy/remove the pillar at the door end, which meant jacking the roof up a bit and temporarily putting in a support post.
(picture # 006)
working on the front edge of the porch roof
(picture # 10)
As you can tell by the look on Alex's face (the one on the right), Brent's shirt (the one on the left) says a lot about the attitudes while working - Mischief! (Byron is the one in the middle)
(picture #008)
New post is in, adding new edging -
(picture #13)
(picture #15)
(picture #18)
The way the project went, work, stop, 'what should we do now?', work ....
(picture #19)
'We have to take this apart so that...'
(picture #21)
Removing the old (VERY leaky) gutters
(picture #24)
p.s., I cleaned the mail box when I did the steps too!
making progress - (Kayla is the girl in the picture, she did a ton of 'can you hand me the...')
(picture #25)
oh the temptation o;-p
(picture #027)
This is what the porch currently looks like. Yes, right now. I just went out and took these pictures :->
(picture #001 from finished porch 2013)
and a closer view -
(picture #002)
(I noticed that the posts for the bottom railing need scrubbed too. Always something)
I also got to pick my new porch light :->
I had always thought our house looked quite a bit like a barn, so that's the style we're going for.
Reminder, if want to see the pictures clearer/larger, just click on them.


No comments:
Post a Comment
To those of you leaving us positive comments - THANK-YOU!!! We really do enjoy them!!!
A change has been made in how your comments are processed. They are now sent directly to the blog owners. If your comment made them smile, it will *eventually appear on the blog. [* depends on when we're on line next]