We have had lots of struggles and challenges in our lives, but we've had even more blessings!

Showing posts with label Pinterest. Show all posts

Friday, December 5, 2014

'Recipes I'd like to try'

   The other evening, Brian had said that he'd like to find a new good recipe for a certain food product. I had replied that I knew I had some on my 'Recipes I'd Like to try' board on Pinterest. He was sure I did too. o;-p  I remembered our conversation the next day and went looking. My search revealed two different things.
   First - That in the end, we're going to end up making our own specialized recipe. See, after looking at several, I found one along the lines of what he wanted, so I copied and pasted it to an email to send him. Then I kept looking. I found first this then another recipe, which was kind of similar to the first, y-e-t ... So maybe if we replaced this product in the first recipe, with this one from this other recipe. Oh, and maybe if we also added this ingredient to the first recipe from that fourth recipe. Yup, I think I have the possibilities fine tuned to a recipe we're going to try making. And he thinks he got the just of it from the explanation in the email. Gonna try it out ourselves before we plan to serve it elsewhere. 
  Second - That my board needed some help! Often, like many other pinners, I just re-pin something one of the people I've chosen to 'follow' has pinned. The pictures look yummy, like something somebody in my little family would like, etc.. Occasionally I'd click on the pin so that it opened another window to the source of the pin (recipe) and verify that we actually would like it (or that with slight tweaking we should). That 'occasionally' needs to change to a habit of always doing so!
     I am literally mind boggled by how many recipes led me to a notice from Pinterest, stating that they had "blocked" the link due to spam, nudity, etc.. Mind boggled. Reportedly, x-rated web sites often draw visitors to their sites, by attaching their web page/site to pictures of things which have nothing what-so-ever to do with what their site is actually about. But to have had that many "recipes" on my board which weren't recipes at all.... mind boggled.
     So I decided to take the time and one by one double check each and every one of the pins on that board. Quite the undertaking, seeings how I had over 700 pins on it. (and yes, that first sentence does sound rather redundant, so did this task.)
     In the process, I found that I had duplicates of about a dozen pins. I was impressed that it was that low. I deleted the duplicates. Or at least I 'think' I got all of them.
     A couple of other times I thought they were duplicates, but it turned out they were from different sources and different recipes. I kept both in case I try one and it doesn't pass the test.
     I was surprised to find that I couldn't actually access certain recipes, unless I signed up to some recipe site/blog. While the pins pictures looked appetizing, instead of signing up, I deleted those pins. I just prefer it that way. Other times I was informed that viewing the blog was by "invite only". didn't realize their were private cooking sororities on line.
    Quite a few times, I found that instead of leading me to the recipe itself, the link led to a web site. Sometimes I was successful in finding the actual recipe, deleted the original pin and then pinned the actual link onto my board. Other times, my searching was unsuccessful and I ended up just deleting the pin altogether. 
    One time I got quite the surprise. The pin stated that it was for a chicken dish that Olive Garden makes. I figured it led to a 'knock off' version of their recipe. Instead, it lead to the restaurant's on line - carry out ordering page. :-p  Here's that link in case you wish to use it -  http://www.olivegarden.com/menu-listing/pronto-lunch.
    There were a few that got deleted just because. I had clicked on it, got to the recipe and said "nope, I don't want to make that".
     Then there were the ones that led to a picture somebody somewhere had posted on Flicker.  No recipe link any-where, just a clearer view of the yummy goodness.  :-[
    Okay, I will admit that I did keep a couple of the pins that led to pinterest blocked warnings. The reasons that I kept the couple that I did, was because there was enough of the recipe included in the pins description itself that I could work with.
    For the record, w-a-y into the process, I realized that instead of deleting the original pin, I could just delete the 'source' of it (click to edit pin), thus redirecting where you go when you click on it. Technology, I'm slow, but eventually I catch on.
    That board has now been totally edited/checked. Can't believe that the number of pins on it dropped down to 600 (601 if you count the recipe Benson sent me and I added last night).
    "Do you ever plan on trying all of them?" you ask. As a matter of fact, we have come up with a 'plan'. We are going to start trying recipes off of it at least twice a week. Once, during the week for dinner. The second one will be as part of Sunday's dinner, albeit the main course, side dish or dessert. Or maybe we''ll do all three and get further faster :-].
    You are hereby invited to go browse through the board yourself and try and all recipes you find intriguing. http://www.pinterest.com/cherylbz/recipes-i-d-like-to-try/

Tuesday, April 23, 2013

Easier way to view ALL of your friends on Facebook

  I enjoy Facebook. Well, most of the time I do. At times I get tired of people's 'drama', which had resulted in me pretty much pulling out of Facebook at one point in time. But I found I missed it. Not the 'drama'. (inset eye roll). I missed having frequent connection with friends. And family. I have friends on there whom I haven't seen in person for years, due to life moving them elsewhere. But via Facebook, we have more of a clue as to what's going on in one another's life's. I like that. A LOT!
   So I returned full force to visiting Facebook.
   Then I got frustrated by a technical aspect of it. It seemed that I was only getting 'feed' from certain people, yet I was friends with lots more. Why did I never see things the others posted? Sure, I could go to my list of friends, find their names, click to go to their home page and read up, but there had to be an easier way, right?!
   There had to be a way....
   Then one day, when Brian had called me in to read something somebody had posted (most likely something he was chuckling over :-p), after I had read it, he moved his courser (the little arrow) over to the left side bar and clicked on something which made a whole different group of people's postings show up. "What did you just do?!?", "Changed which list I was on", " 'Spalin to Lucy!"
   He had gone through his list of friends and divided them up into groups. He only explained it a bit, but I was intrigued! I had to figure this out and implement it for myself. Exclamation point.
   So I did*. And if I can, then definitely you can to!
   First step - open another tab onto your main Facebook page.
   Second Step - Hover your little mouse controlled arrow, over a friends name. A little box will magically appear. SLOWLY move the arrow down to the 'Friends 'check mark' ' box. Slowly, otherwise either the box will disappear, or you will suddenly be on that person's home page.
   A second box will now magically appear. This box is a list of options. At the top it says, "Get notifications". Then there is a light line. Next comes, "Show in News Feed", then "Settings". Another light line. Below that are, "Close Friends", "Acquaintances" and "Add to another list". There's more below that, but we aren't going to talk about them today.
   Third Step - click on the "Settings". The box changes and displays new options. At the top it reads, "Go Back?", then a thin line and it asks, "See which updates?". Your listed options are, "All updates", "Most updates", or "Only Important".  If you are super into that particular person, or you are a stalker, then you'll want to click on "All updates". I always click on "Most updates".
   Under another thin line it asks, "What type of updates?". Your listed options are, "Life events", "Status updates", "Photos", "Games", "Comments and Likes", "Music and Video's" and "Other Activity". You'll notice that unless you have already personalized these settings yourself, every single option is checked. Personally, I always click to un-check "Games". I do Pinterest, I don't need games too :-p. Unless they are a very close friend, I click to un-check "commetns and Likes" too. I also un-check "other activity". That leaves me getting info. about when they post about their life's events, their status updates, the pictures they post for us to enjoy, and if they come across a wonderful music video they want to share. If it looks intriguing, I can watch it. If it doesn't, I can scroll right on past it.
   Fourth Step - Now scroll back up to the top of that third magically appeared box and click to "Go Back". Your now back to the list which starts with "Get notifications". I un-check that. Under the thin line it says, "Show in News Feed". The way I now have mine set up, I only leave that checked for my closest friends. Everybody else got un-checked. Under the next thin line it lists, "Close Friends", "Acquaintances" and "Add to another list". IGNORE THE FIRST TWO!
   Remember this higher up in this posting, "So I did*",? I thought by putting people that I randomly know from here or there on the "Acquaintances" 'list', would make it so that I had access to their posting that-a-way. Wrong. Over time, I started wondering why so-and-so never posted anything anymore. When I went and checked their home page, they had posted. hummm. Double check my settings, 'yup, they are under acquaintances". "Weird". More on this again in a minute*.
   Fifth Step - Click on "Add to another list". The box will change again. At the top, it will again read, "Go back". Under a thin line it will read, "Add to lists" and you will have the option of making your own list titles. I divided my facebook friends up into groups ("lists") such as, 'from church', 'from camp', 'from day camp', 'immediate family' ( = my husband, our kids, some of our "part time" kids), 'extended family' ( = all of the people (excluding my own little family) who are in some way legally related to me), and 'random people*'.  Break people up onto your own lists, in what ever fashion you want.
   I don't click to 'go back'. That way if I ever want to double check which list somebody is on, all I have to do is hoover the little arrow over 'friends, check mark' and it shows me.
   In the future, should you decide that you want to again see games they join, etc., you first have to click to add them back to 'show in news feed' for 'settings' to show up. After your done adjusting things, remember to un-check "Show in news feed", or that person will now show on your first page when you sign into facebook. 
   Sixth Step - In the left hand corner, at the top of your facebook tab, click on the word "Facebook". Your screen will change. As you scroll down, you will only see things posted by the people whom you left "Show in news feed" clicked on for. At the top of your left hand side bar, under your profile picture, will be a subtitle of "favorites". Next subtitle down will read, "Friends". Under that, you will find all of your own list titles. Read through the postings showing, then one by one, click on and read through all of your different lists. This way, you actually see things that everybody you are friends with have posted. And even though it does take a bit of time to set all of this up, in the end, it is ever so much easier than trying to go to every bodies home page and reading their postings that-a-way! So fix yourself a nice cold beverage of your choice and go to it! :-D
   Now, about 'random people*'. In the early hours this morning, after having sent a comment to somebody off of that 'Acquaintances' list, thereby noticing that they had done numerous posting lately I had no clue of, I had re-looked over the list of 'my friends' lists titles and realized that there wasn't one on there titled"acquaintances". ' Then why is that option available on their magical box?!?', "I'll fix that", I said to myself (yes, literally O;->), and I went back through my friends list and every single person who was checked as an 'acquaintances', got moved to a newly created list I titled 'random people'. "Much better", relieved sigh.


    While I'm on this subject, of people your friends with on Facebook...
   A while back, I had questioned Brian about how I could un-friend somebody, without causing any hard feelings, etc.. I was just tired of seeing this particular persons postings, all of their (from my perspective) self induced "drama", etc.. He had chuckled and stated that he had changed his settings, so that that same persons postings, didn't show up on any of his lists. "HOW?!" (remember, I'm 'Lucy'). "Just make sure they aren't checked to show up in your news feed, nor have you added them to any of your lists. BINGO! I tell you, I have a very wise, technically savvy, husband! THANKS Brian! :-D
   Now, I am fully aware that some of you have scanned through this posting and thought "Duh!". I tip my hat to you, for 'getting' all of this easily. My hope is that there are others out there more like myself, whom will benefit by reading these tips.

Thursday, October 4, 2012

So-o pinteresting

   I had mentioned in Tuesday's posting, how browsing pinterest was a good thing to do while being on hold. Turns out it's also a lot of fun to do late at night, while waiting out hot flashes. I have had ever so much fun stumbling across things to pin to my boards.
   The other night I had decided to pursue pins for one particular board. I typed that name into the 'search' bar, then once pic's came up, I clicked on 'boards', meaning that I wanted to see boards other people have for that subject matter. I usually look at the main picture as well as the four little pictures underneath, then decide if I think that board might have materials I too might like. Sometimes that methodology works. Other times, not so much. The other night I knew I was going to be up for awhile anyways, so I pretty much just went board by board down the wall.
    Things I found both amused and befuddled me. I'd be scrolling down through some peoples boards and start thinking things such as, "really, you like THAT?!?", or, "why in the world would you even pin that?!?". But then on other boards, I'd be smiling my way through and repinning this or that thing I really liked. The big irony that hit me, was that I started noticing that most of the time the boards I didn't like the most, were also the boards that had the highest number of followers. 'Nothing new there I guess, never have been one to follow fads, or be part of the 'in crowd'. I tried to shrug it off and just do that particular board the way I had the others in that 'category' - my way/style. After all, they are 'my' boards. I do so enjoy looking through them over and over again.
   But I didn't succeed in fully shaking that felling of disappointment. I'd like to be the owner of boards that has high number of followers. Why is it that I'm always so different?  Same 'ole human feelings that I've struggled with for years. I know that God made me me for a reason. I know that wanting to have high number of followers is a pride issue. I prayed about all of it. I determined with in my mind, to let go and just enjoy pinterest for what it is, a world wide collection of styles and ides, out of which I can set aside the ones that I really like, on what ever board I choose to do so.
   The next morning God had an awesome surprise waiting for me. I usually check my emails, then Facebook, before venturing forth into pinterest. The surprise awaited me on Facebook. Abby A. M. had posted this to my wall - "I could seriously look at your pinterest for hours. It's like this huge collection of awesomeness."  And Laurie M. had 'liked' it. My reply back was, "WOW! Thank you ever so much!!! just wow!"

Friday, March 23, 2012

Garlic Parmesan Pull-Apart Bread

   Just so you know, this posting is actually part three of a 'probably' four part series, out of which came three different meals. Two of the recipes are my own, which I had made up years ago and everybody still loves. The other two, were items I found via Pinterst and wanted to try. They were H-U-G-E hits! :-D

    For the same meal when I experimented with the Pasta Pie recipe, which I posted about yesterday, I also experimented with trying the Garlic Parmesan Pull-Apart Bread which I had also found via Pinterest. Yes, I tried two new recipes on my family in the same meal. I could just tell by reading them that a) they were meant to go together, and b) I would be more surprised if my family didn't like them, than if they did. I was right. On both accounts! "Love it when a plan comes together!"  :->
     To see my pin, go HERE. To see the blog posting and blog that it had originally been pinned from, go HERE.  (For what it's worth, the story Kristen (the blog owner) shared about pancakes during this posting, both cracked me up and made me ever so glad that I am NOT the only one crazy things happen to in the kitchen! Seriously!)

         As you would expect from me, I was making more than just a single batch. This time, I had done three times the recipe. I knew a single batch would not be sufficient for our Sunday dinner that week! Just wanted you to keep that in mind when you are looking at the pictures. :->

    First step - In a large mixing bowl, stir together the yeast and water.

    Let sit for five minutes until the yeast is foamy.

   Mix in the olive oil and salt

   and Flour

    Second step - I was doing this by hand, for which the instructions say to, "knead the dough for 5 to 6 minutes or until elastic". But do to having "help", I chose to knead it still in the bowl. If you've ever tried to knead dough with a young enthusiastic helper, you'll probably understand my reasoning.
   (My plan had been to get everything into the oven and then jump in the shower. thus my outfit and overall appearance. The ONLY reason I am even using these pictures Benson had taken is for later inclusion in Analyse's memory book. )

     I like the comparison of our hand sizes.

   Third step -  the instructions say to "transfer dough to a lightly oiled bowl". I pulled the kneaded dough out of the bowl for a minute. Thourally / heavily sprayed the bowl with pan coating spray, put the dough back in to the bowl, then rolled it around so that all areas of the dough ball had spray on it.
    You then cover the bowl with a clean kitchen towel and allow the dough to rise for 1 1/2 to 2 hours, or until doubled in size.
      (I have found that sitting the bowl inside my not turned on oven both gets it out of the way for now, and keeps it in a draft free environment. <-- BONUS TIP there)

     Fourth step - the making of the butter mixture.
     In a small bowl, combine melted butter,

    parsley flakes,

     and garlic powder.

     Fifth step - prepare the baking pan. I chose to use by Angel food type cake pans for this, seeings how I don't have 'bundt pans'. First I heavily sprayed the pans. then, thinking about how the dough is dipped in the butter mixture, I thought it best to also line the bottom with a half piece of parchment paper (I buy the packages of industrial sized sheets of parchment paper).


    Sixth step - Punch down the dough.

      I always feel kind of mean doing that, after it's been good and risen oh so nicely!

     Seventh step - Tear off small pieces of dough

   and coat in butter mixture.


     Seventh step - place the dough in the bottom of the pan. Repeat this process until you have a full layer.

     Sprinkle on 1/3 of the Parmesan cheese.

    Add another layer of dough balls.
 
     And another layer of the Parmesan cheese.

     According to the directions, you are then suppose to add a third layer. This time I only did two layers. I'll tell you about the second time I made this recipe and adding a third layer, in an upcoming posting.    

    Eighth step - Again cover the dough with the towel and let it sit until it has doubled in size. about 20 to 30 minutes.

    Ninth step - Preheat oven to 350o (175 degrees C)
         Bake for 25 to 30 minutes, or until bread is golden brown.

    Remove bread from pan and serve hot,
    with a side of marinara or tomato sauce.

      My 'Marinara Sauce' -

         1 large can Tomato Sauce
         1 1/2 Tablespoons Garlic Powder
         3/4 Tablespoons Italian Seasoning
      Blend together thourally while heating. Pour into a serving bowl and use a gravy ladle to scoop it out.

     We served it with the choice of marinara sauce, or good ole' ranch dressing. Both options were well liked.
       
         And now for the actual bread recipe -
        Garlic Parmesan Pull-Apart Bread
                recipe from Kristen at 'The Pastry Affair' blog

     Yields 1 loaf

     2 teaspoons Active Dry Yeast
     1 1/3 cups barely warm Water
     2 Tablespoons extra-virgin Olive Oil
     2 teaspoons Salt
     3 1/2 cups all purpose (or bread) flour
     1/4 cup butter, melted
     1 Tablespoon dried Parsley Flakes
     3 Tablespoons Garlic Powder
     1 cup (freshly grated) Parmesan Cheese

     In a large mixing bowl, stir together the yeast and water. Let sit for 5 minutes or until yeast is foamy. Mix in the olive oil, salt and flour. If you have a stand mixer, attach the dough hool and kned the dough for 5 to 6 minutes, or until elastic. If you are doing this by hand, knead the dough ion a lightly floured surface until dough is elastic, 7 to 10 minutes. Transfer dough to a lightly oiled bowl and cover with a clean kitchen towel. Allow to rise for 1 1/2 to 2 hours, or until dough is doubled in size.

    In a small bowl, combine the melted butter, parsley flakes and garlic powder. Set aside.

   Punch down the dough. Tear off small pieces, coat in the butter mixture and place in the bottom of your baking pan. (She used a bundt pan, I used an Angel Food type cake pan).  Repeat this process until you have one layer of dough balls. Sprinkle on 1/3 of the Parmesan Cheese. Repeat process. Cover the pan with a clean towel and allow to sit until dough has doubled in size, 20 to 30 minutes.

    Preheat oven to 350o
  
    Bake for 25 to 30 minutes, or until bread is golden brown.
   Serve hot with marinara sauce or ranch dressing.


~ ~ ~ ~ ~ ~ ~ ~ ~ ~ ~ ~
I 'plan' on linking this particular posting up to:

  ~ "Full Plate Thursday('s)", are hosted by Miz Helen, at 'Miz Helen's Country Cottage' (http://mizhelenscountrycottage.blogspot.com/).     
  ~ "Foodie Friday('s)", are hosted by "Gollum" (aka: Michael), at 'Designs by Gollum' (http://designsbygollum.blogspot.com/)   
  ~ "Sweets For A Saturday", hosted by Lisa, at 'Sweet As Sugar Cookies' (http://sweet-as-sugar-cookies.blogspot.com)
  ~ "Simply Delish Sunday('s)", are hosted by KB and Whitesnakes, at 'KB and Whitesnakes Home' (http://kbandwhitesnakeshome.blogspot.com)
 ~ "Creative Monday's", are hosted by Clair Justine, at 'Clairejustineoxox' (http://clairejustineoxox.blogspot.com/), and Judy, at 'Judy-H-JS Thoughts' (http://judyh-jsthoughts.blogspot.com/)
  ~ "Homemaker Mondays ... Yours, Mine & Ours", are hosted by Jen, at '11th Heaven's Homemaking Haven'  (http://rtheyallyours.blogspot.com/).
  ~ "Making Your Home Sing Monday('s)", are hosted by Nan, at 'Mom's the Word (I love to hear)'  (http://momstheword--livingforhim.blogspot.com/).
  ~  "Kitchen Tip Tuesday('s)", hosted by Tammy, at 'Tammy's Recipes'  (http://www.tammysrecipes.com/). 
 ~ "Tuesday's Tasty Tidbits", hosted by Susan, at 'Permanent Posies / Creative Chaos' (http://permanentposies.com/)
 ~ "Totally Tasty Tuesdays", are hosted by Mandy, at 'Mandy's Recipe Box' (http://www.mandysrecipebox.blogspot.com/).
  ~ "Tempt My Tummy Tuesday('s)", are hosted by Lisa, at 'Blessed with Grace'  (http://www.blessedwithgrace.net/).
  ~ "Foodie Wednesday('s)", are hosted by Bibi, at 'Daily Organized Chaos' (http://www.dailyorganizedchaos.com/). 
   ~ "These Chicks Cooked Link Party",
hosted by Katie L, at 'This Chick Cooks' (http://thischickcooks.blogspot.com)
  ~ "What's Cooking Wednesday('s)" (shall we say # 1 ?), are hosted by Cristi, at 'The King's Court IV' (http://www.thekingscourt4.blogspot.com/), and by  Diane, at 'Turning The Clock Back' ("one eco friendly step at a time") (http://turning-the-clock-back.blogspot.com/)).       

Thursday, March 22, 2012

Pasta Pie

     Just so you know, this posting is actually part two of a 'probably' four part series, out of which came three different meals. Two of the recipes are my own, which I had made up years ago and everybody still loves. The other two, were items I found via Pinterst and wanted to try. They were H-U-G-E hits! :-D
    Yesterday's posting was about one of my own recipes, 'Spaghetti Sauce'. One of the reasons that I had made such a big batch of it, was so that I could use it in the Pasta Pie idea I had pinned on Pinterest.
     To see my pin, go HERE. To see the blog posting and blog that it had originally been pinned from, go HERE. The blog owner said she had adapted it from one of Martha Stewart's recipes. I tried to find Martha's recipe on line, but couldn't.
    
    Yes, the pinned 'Pasta Pie' did contain a recipe for the sauce to use in the pie. But knowing how much my family likes my sauce, and wanting to make it for a couple other dinners/recipes as well, I opted to use my own Spaghetti Sauce in this pasta pie recipe.  (Hopefully all of that just made sense.)

    Your first step then to make this recipe the same way that I did, is to make my recipe for Spaghetti Sauce.

    Second step - Bring a large pot of water to boiling. Squirt it with one good squirt of pan coating spray. (Doing so will help the noodles not stick together while cooking.). Cook the noodles about two minutes less than their package says to. According to the blog this recipe came from, "One pound of pasta should be cooked in 6 quarts of water. Make sure you use a big enough pot so the pasta doesn't stick together.".
     When your timer goes off (easiest way I know of to keep track of how long somethings been boiling/baking/sauteing/etc.), pour the contents of the pot out into a big strainer sitting down in your sink.

    Rinse the noodles in cold water. Shake the strainer real food. Rinse again. Dump the noodles into a large bowl and toss with 1 Tablespoon of Olive Oil to coat. (Doing so helps them not stick together while sitting there.)  Then toss the pasta with Parmesan cheese (preferably the fresh shredded type).

    Third step - Spray a 9 inch springform pan with pan coating spray. With one hand holding the pan up at an angle, start tightly packing the pasta into the pan, standing open tube in up.

    Keep going -

     Until the pan is completely full, like this -
       Yes, according to Benson, this is completely tedious boring work. We needed more than one for our Sunday dinner, so he was doing up one pan while I did the other. (Thanks again Benson!)
 
       Sprinkle the full pan with some more Parmesan cheese, for good measure.

      If you too had made the Spaghetti Sauce up a couple of days ahead of time and it's been in your fridge blending it's flavors together into awesomeness like ours was,

        have your husband reheat some for you. (Thanks again Brian!)

        Fourth step - Then start ladling the warmed meat mixture onto the noodles and using a big wooden spoon (or at least that's what I used) pat/pack it down into the open noodle holes.

      Quick movements like this, help. o;-p

      It will start looking like this -

      Add more sauce and work it down into the noodles too.

        I don't know if it was due to how thick my sauce is, or what, but it just seemed to us like not as much sauce was going into the noodles like it should be. So we chose to add a layer of the sauce to the top of the pan.

       Next comes a hearty layer of shredded mozzarella.

      Hearty layer!

      Both pan fulls ready to go in to the oven.

     Bake at 400o for 25 to 30 minutes.
     Remove from oven and let stand for 15 minutes. ( <-- IMPORTANT!)
      Run a regular table knife around the edge of the pan to loosen and then unmold.
        and,

      To serve, slice it into wedges like you would a regular pie.

     This is a picture of our meal that Sunday.
         (Next time we are going to serve it sitting on a pedestal cake stand. The 'Wow' factor will increase! )

     Dinner menu:
      Pasta Pie
      Garlic Parmesan Pull-Apart Bread (that's tomorrow's posting ;->)
      Home made Marinara Sauce (for dipping the bread in)
      Salad
      Salad
      Beverages
      Chocolate Dipped Pretzel Sticks (yet another 'pinned' recipe ;->)

     The conscientious?  "Mom, I know this takes a lot of time and effort to make, so maybe not have it often, how about every other month?" That came from all the way around the table! Yuppers, we had a winner!

         And now for the actual recipe -
             Pasta Pie
                 Cheryl B. adapted it from Cathy at the 'Noble Pig' blog,
                     who had adapted it from Martha Stewart.

      One recipe Cheryl's Spaghetti Sauce
      1 pound *Rigatoni Noodles
      1 Tablespoon Olive Oil
      2 cups finely grated Parmesan Cheese, divided
      8 oz. grated Mozzarella

     While bringing a big pot of water to boil, start reheating some of the Spaghetti Sauce you had made a couple of days ago.
     Once the water reaches the full rolling boil point, spray it with one hearty spray of pan coating spray, then dump in the uncooked noodles. Cook the noodles two minutes less than directed to on their packaging. When the time is up, dump pan contents into a big strainer sitting down in your sink. Rinse well with cold water. Repeat.
    Dump the noodles into a large bowl and mix with the Tablespoon of Olive Oil.  Then mix with one of the cups of the Parmesan cheese.
    Heavily spray the inside of a 9-inch springform pan.
    Holding the pan up on an angle with one hand, use your other hand to start packing the noodles in in standing up position. Keep going till pan is really full.
   Sprinkle the full pan with some more Parmesan cheese, for good measure.
    Push the spaghetti sauce in to the noodles, hopefully filling them all the way up.
    Add a layer of the spaghetti sauce to the top of the filled noodles.
    Top that with a hearty layer of mozzarella cheese.

     Bake at 400o for 25 to 30 minutes. Remove from oven and let stand for 15 minutes. Run a knife around the edge to loosen and then unmold.

     Cut into wedges (pie style) and serve.

      (about the * by Rigatoni Noodles. Next time we are going to try a similar shape but larger around noodle.)


~ ~ ~ ~ ~ ~ ~ ~ ~ ~ ~ ~
I 'plan' on linking this particular posting up to:

  ~ "Full Plate Thursday('s)", are hosted by Miz Helen, at 'Miz Helen's Country Cottage' (http://mizhelenscountrycottage.blogspot.com/).     
  ~ "Foodie Friday('s)", are hosted by "Gollum" (aka: Michael), at 'Designs by Gollum' (http://designsbygollum.blogspot.com/)   
  ~ "Sweets For A Saturday", hosted by Lisa, at 'Sweet As Sugar Cookies' (http://sweet-as-sugar-cookies.blogspot.com)
  ~ "Simply Delish Sunday('s)", are hosted by KB and Whitesnakes, at 'KB and Whitesnakes Home' (http://kbandwhitesnakeshome.blogspot.com)
 ~ "Creative Monday's", are hosted by Clair Justine, at 'Clairejustineoxox' (http://clairejustineoxox.blogspot.com/), and Judy, at 'Judy-H-JS Thoughts' (http://judyh-jsthoughts.blogspot.com/)
  ~ "Homemaker Mondays ... Yours, Mine & Ours", are hosted by Jen, at '11th Heaven's Homemaking Haven'  (http://rtheyallyours.blogspot.com/).
  ~ "Making Your Home Sing Monday('s)", are hosted by Nan, at 'Mom's the Word (I love to hear)'  (http://momstheword--livingforhim.blogspot.com/).
  ~  "Kitchen Tip Tuesday('s)", hosted by Tammy, at 'Tammy's Recipes'  (http://www.tammysrecipes.com/). 
 ~ "Tuesday's Tasty Tidbits", hosted by Susan, at 'Permanent Posies / Creative Chaos' (http://permanentposies.com/)
 ~ "Totally Tasty Tuesdays", are hosted by Mandy, at 'Mandy's Recipe Box' (http://www.mandysrecipebox.blogspot.com/).
  ~ "Tempt My Tummy Tuesday('s)", are hosted by Lisa, at 'Blessed with Grace'  (http://www.blessedwithgrace.net/).
  ~ "Foodie Wednesday('s)", are hosted by Bibi, at 'Daily Organized Chaos' (http://www.dailyorganizedchaos.com/). 
   ~ "These Chicks Cooked Link Party",
hosted by Katie L, at 'This Chick Cooks' (http://thischickcooks.blogspot.com)
  ~ "What's Cooking Wednesday('s)" (shall we say # 1 ?), are hosted by Cristi, at 'The King's Court IV' (http://www.thekingscourt4.blogspot.com/), and by  Diane, at 'Turning The Clock Back' ("one eco friendly step at a time") (http://turning-the-clock-back.blogspot.com/)).       


Tuesday, March 20, 2012

Tulip Wreath # 2

   In THIS posting I had both told and showed you the tulip wreath I had made for my mother-in-law's grave. Near the end of the posting I had written, "Not sure what I'm going to do when I make the one for myself. Do I make the flowers go one direction around the wreath, or do I do it this way again? ...."
    Much earlier in that posting I had written this, "Here's a link so that you can see the picture I had pinned of the wreath. Turned out that the 'trail' didn't lead back to a tutorial on how to make them, rather it went to a etsy shop where you could order one. "Okay then, you've made plenty of wreaths before. Your capable of winging this!" (I said to myself.)"
    For mom's, I had gone up both sides of the wreath with the flowers. For the one I made for myself, I went all of the way around the wreath. It went *pretty good.
    What do I mean by "*pretty good"?
    First off, I had gone with the guys to Brian's dad's house on Sunday and taken my supplies and started working on it there. Therefore, I did not lay the flowers out around the wreath before I started attaching them, like I had on the wreath for mom. I worked on it some at dad's. And then some the next day here at home. And then finished it up the following day.
    My recommendation is, if at all possible, lay your flowers out around the wreath form first!   Going back later to unattach ones of a certain color, cuz your running out of that particular color too fast... challenging! Do-able, but challenging!
    Secondly, I had caught on part way into making the first tulip wreath, that it is much easier to cut about a dozen lengths of the tie on wiring at a time. Other wise, your always shifting too many gears, so to speak. I did it this time too, just not as many at a time due to not making it all in one setting.
     Thirdly, if you too decide to work on it in your lap, while your sitting on the couch or the floor, make sure your wearing long pants. We are currently experiencing record breaking high temps here in Michigan. So I had shorts on. My legs now have several red scratches from the wreath. 8-[.  Lesson learned.
    This is what the finished project looks like.

    Soon I shall be making the wreath out of those other flowers that had been on sale... o:->

Monday, March 19, 2012

Peeps Wreath

    As I had mentioned in THIS posting, I had made two wreaths. Today's posting is about the other wreath.
    My dear friend 'Jewels' birthday was quickly approaching and I wanted to do something both fun and special for her. She LOVES  Peeps(R). I had been seeing all kinds of ideas of things to do with Peeps over on Pinterest. Humm... which should I do? She unknowingly answered the dilemma herself. She had sent me a message asking if I had any old magazines she could have (it'd been awhile since I'd given her any). When I dropped them off on her porch, I decided that her front door NEEDED a spring type wreath. Thus the choice was made. I would make the Peeps wreath I had seen, pinned and debated over.
    To see the pin of the idea on my Pinterest board, go HERE. To see the blog posting the wreath had originally been pinned from, go HERE.
    Knowing myself, I had looked up that posting and written down the list of needed materials before Amy and I headed out. The thing was, the blog owner hadn't specified whether the amount of packages needed to make the wreath, were single or double packages. 'Tis better to error on the side of caution'. So I purchased nine of the double packs. Thankfully, Amy knew that Walmart had them on sale. :-D
        I gathered together my materials.
    I ended up not hanging the bunny in the middle of the completed wreath like I had intended to do. There just wasn't room.
         After rereading the instructions on the blog posting, I got started. Insert a toothpick up into the bottom of a peep, until the top tip just barely doesn't break through the top of the head of the Peep. If it does, back it out a bit and squeeze the Peep. They heal wonderfully.
     Push the toothpick down into the straw wreath.
     That took a bit of doing. After having done a bunch, I questioned if perhaps I was suppose to have removed the plastic covering.
       I decided to cut off just one small area and try it. (if you squint just right, you can see the difference. :-p)  Oh yeah! MUCH easier!  So a snipping I went. Used a pair of scissors (Why is it a "pair of scissors"? It's only one thing, right? Or are the two blades that come together actually the 'scissor' part?) and cut a line all of the way around the wreath, figuring that would be the easiest method to remove the plastic.
     It was. The thing was, I didn't realize that I had also cut through a lot of the plastic string binding the straw into the wreath form. :-[
     BOTHER!!! !!!
     I didn't want to bother Amy into running to get a replacement one. I believe in 'waste not want not'. 'Think, think, think'... "Thank you Lord!"  I got the twine out and rebound the wreath.

      I went the whole way around 'just in case'.
     As you can see, my 'oops' had made a mess!
     Thankfully I was working at the table. It eased clean up tremendously! Hold the trash bin at the side of the table with one hand and brush the extra straw into it with the other hand.
     I only shared all of that with you to hopefully save you from doing it yourself. Your Welcome! o:->

    As you might have noticed in the picture of the supplies I bought, I had only picked up one package of the blue Peeps. Yes, on  purpose! Gee-sh... ;-p
    I put one row of the blue Peeps around the middle of the wreath.
    Next step was to add some pink ones.
      I had thought it would be neat to do a every other side pattern with the pink and yellow ones.
     While the 'plan' made sense... it didn't stay that way the whole way around as I got really into working. I wanted as little of the straw to show through as possible. So at first I stuck them in this way. Then I pulled some back out and changed them a bit. Then again. Then I told myself that 'Jewels' would love it, whether the pattern was O.C.D. perfect or not. Deep breath.
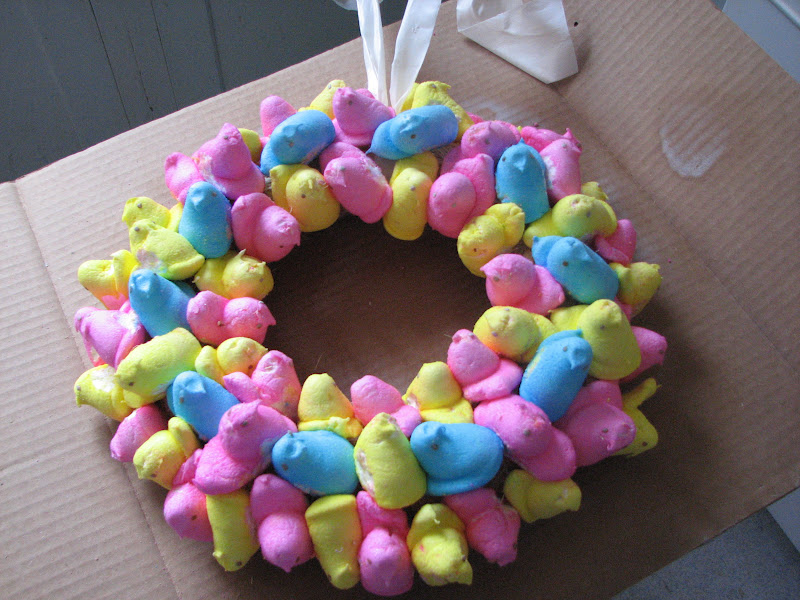
    And the whole filled in wreath -
     And from a hanging type position -
     And after Brian had sprayed it hardily with the clear coat paint, and I had added the white ribbon to the top I was going to hang it with -

     In the future, I see no reason to spray one. No, the blog had not instructed me to do so. It was just an idea I had had. One I hoped would help make the wreath last longer. By the time I got it to her house and hanging, I had put three of the Peeps back in, three times! (no, I didn't keep track if they were the same three Peeps.) I should have just left it alone and allowed her the privalage of snacking on them every time she came and went from her house.
     But I did allow her some snacking pleasure. It turned out that I only used seven and a half of the double packages. I wrapped up the two unopened packages and left them for her too. And yes, I let her know not to eat the ones on the wreath itself. I want to keep her around for a long time! :-b
    I didn't take the camera with me, so I don't have a picture of the wreath hanging on her front door.  But I will tell you that as I started to get back into Amy's van she declared "That's really cute!". And that type of a comment is not A-typical of Amy. I was thrilled!
     Did Jewels like it? She left this comment on her Facebook page shortly after having arrived home that evening - "oh my do i have some amazing friends... came home to a peep wreath on my door and peeps to eat by my friend cheryl b. and had an awesome time with sandy j. last night... birthdays are not about getting older, they are about understanding how much you are loved..! ! ! thank you both!"
     Mission Accomplished! :-D

(For those of you whom get our postings via email. Thought I'd let you know that our blog is now decorated for Easter. You can see it HERE.)


~ ~ ~ ~ ~ ~ ~ ~ ~ ~ ~ ~
I 'plan' on linking this particular posting up to:
  ~ "Amaze Me Monday('s)", are hosted by Carrie, at 'Dittle Dattle' (http://dittledattle.blogspot.com/).
  ~ "Making Your Home Sing Monday('s)", are hosted by Nan, at 'Mom's the Word (I love to hear)'  (http://momstheword--livingforhim.blogspot.com/).
  ~ "Homemaker Mondays ... Yours, Mine & Ours", are hosted by Jen, at '11th Heaven's Homemaking Haven'  (http://rtheyallyours.blogspot.com/).
  ~ Show Me What Ya Got" (Tuesday's), hosted by Stacey, at 'Not JUST A Housewife' (http://www.notjustahousewife.net/)
  ~ "Anything Goes" (Tuesday's), hosted by Tammy, at 'Type A Decorating' (http://typeadecorating.blogspot.com/)
  ~ "Hookin Up With The Hepworths Every Thursday", hosted by Allison, at 'House of Hepworths' (http://www.houseofhepworths.com) 
 ~ "Inspiration Friday('s)", hosted by Vanessa and Heather (sisters), at 'At The Picket Fence' (http://www.atthepicketfence.com)
  ~ "Feathered Nest Friday('s)", held at 'French Country Cottage' (http://www.frenchcountrycottage.blogspot.com)
 ~ "Saturday Is Crafty Day", hosted by Laura, at 'Along For The Ride' (http://iamalongfortheride.blogspot.com/)
 ~ "the simple things", are hosted by Rebecca, at 'simple as that' (http://rebeccacooper.blogspot.com/).