
When I learned that we had a grandchild on the way, I KNEW that I wanted to again start quilting, and that I WANTED to make a quilt for our grand baby. Originally in my mind, I was going to give it to them at the child's birth. But then..., and then..., and then my sewing machine died, and ... yeah. But hey, she did receive it at her first birthday - that's pretty good for a 'I really want to get around to it' project. o;-p
While the fabric stores do carry an all inspiring, wondrous collection/variety of materials, I wanted to do it a different way (surprised? o;-p). Lot's of quilts of old were made from materials from the scrap bag / the families out grown clothing. I wanted to do it more like that, but I did not have such a supply available. Then I got inspired with a sort of the same thing idea. Now a days, people donate their out grown or no longer wanted clothing to mission stores, right? Okay then!
So over a year and a half ago, with Robin P. in tow, I headed out Plainfield to the Salvation Army and Goodwill stores. I was on a mission to find materials that matched in colors and complimented each other in patterns to cut up and make quilt squares out of. We were ALL over those stores! Only the infant clothing sections remained unsearched, due to there not being enough material in that size clothing. We were over here, and then 'I think I saw something that might work with this over there', and then .... . We left the Salvation Army store with a couple of yet unmatched / yet I really liked pieces. When we got to the Goodwill store, we got permission to bring them in there to find matches for. Most we did. The rest eventually got re-donated.
For the record, no, I did not yet know which pattern I was going to make. I had done some searching for baby quilts on line. And I had been nabbing up quilting books at mission stores and the used book store. No matter which I decided on, it would take material.
Here are the clothing pieces the quilt squares were made from.

This is a young teens striped shirt and a cotton skirt


This mens shirt and a women's blouce
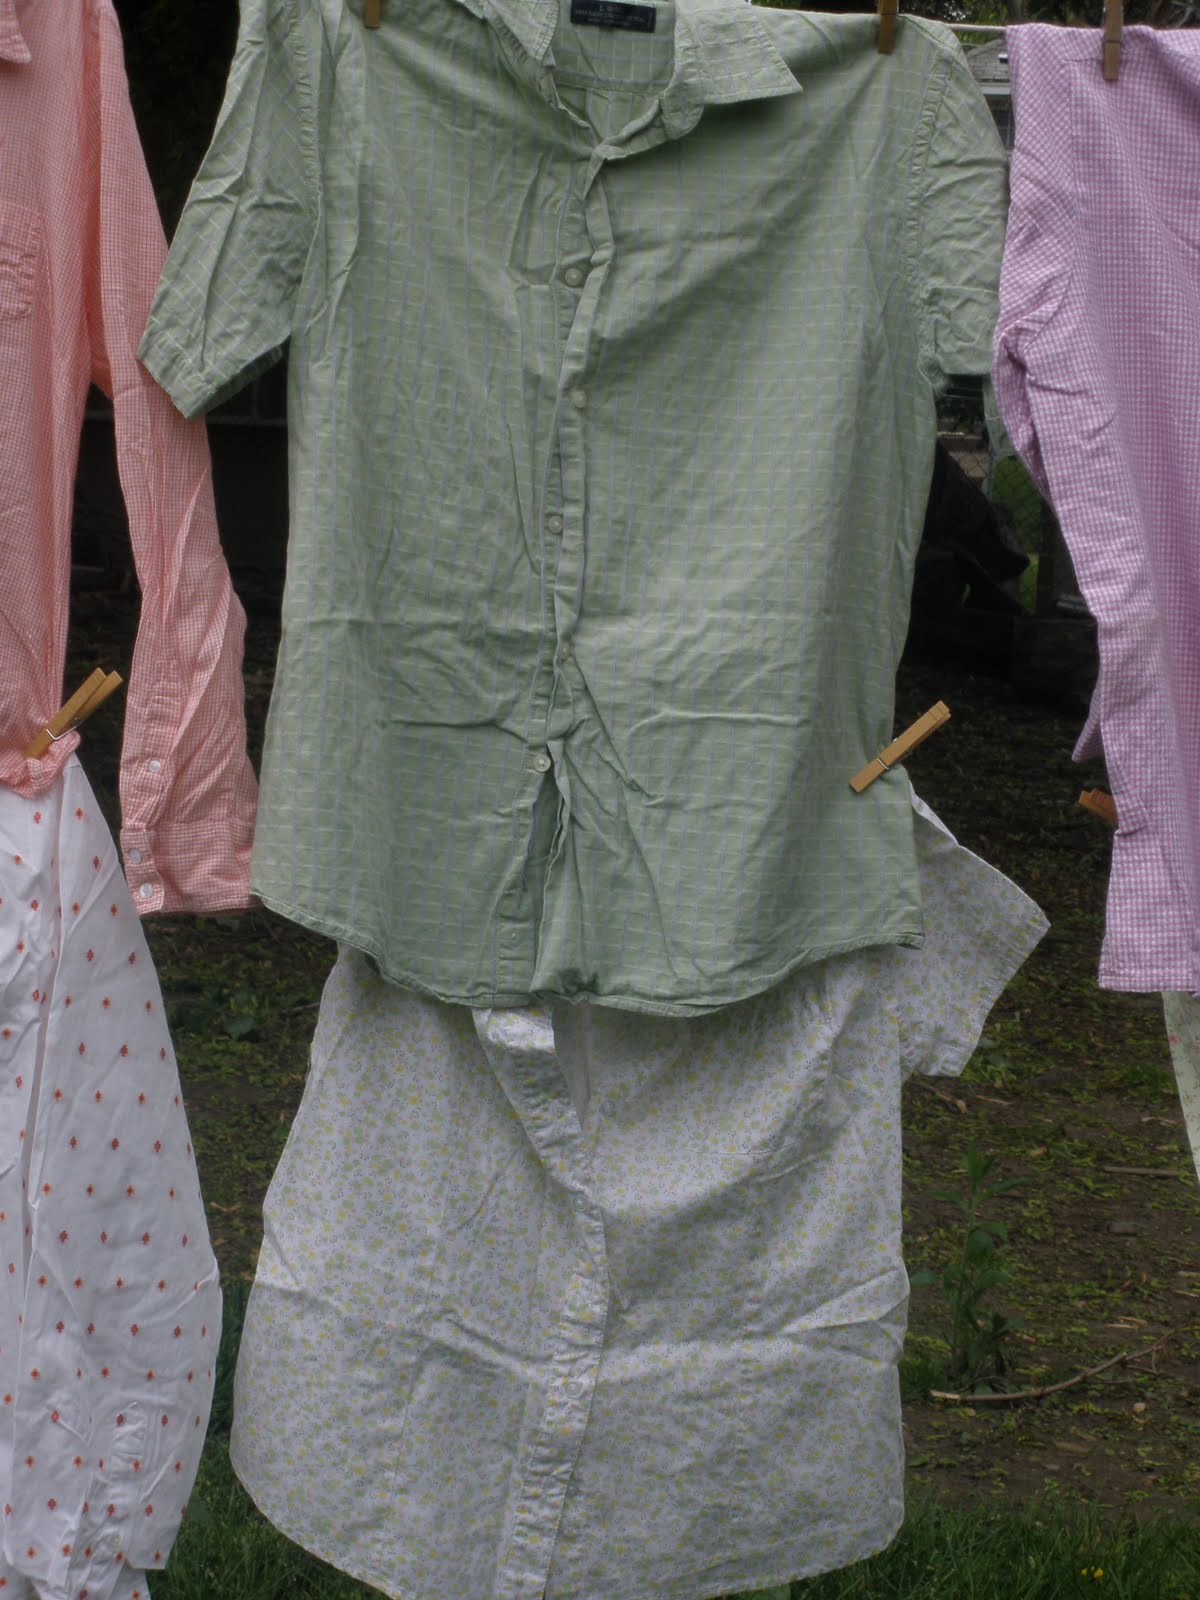
is what this quilt square came from

This women's oxford and a pair of child sized pants

is what this quilt square came from -

This combination of a women's super soft Tshirt and sleep pants (which I was ever so tempted to just keep and wear o;-}) -

is the combination that this quilt square came from

This really cute and soft ladies nightie and a teen sized jumper -

made up the combination for this quilt square

But then I needed three more squares to equal ten total for one side of the front of the quilt. By mixing things around, I came up with these combinations:


The backing for the quilt was going to be a nice soft cotton crib sized sheet which I had also picked up at the Salvation Army store. (A)
When I had been gathering things together to donate to our youth groups mission trip garage sale, I had started to include the mattress pads off of the bunk beds which we no longer had. I checked them over, pretty sure they were still in almost new condition. They were. As I started folding them up an idea hit me, these would work wonderful as quilt fillers/liners! (B) It actually made the quilt feel more along the lines of a comforter than a quilt. Nice and warm! (Hey, that thing called winter will come around again!)
I had my twenty squares, but they weren't quite big enough to fill the backing. Hummmm. Yes, I could just cut down the backing, but in a way I wanted the squares separated so they showed prettier. Hum mmm. I found a solid soft pink colored flat sheet in my linen closet from back when we had thought Jeannie might be moving in with us. It too had come from some mission store. I measured and cut that into strips to run both parallel and vertical between the squares.(C) Nice! Thanks Lord!
This then is a picture of those three things. Unfortunately, the backing doesn't show that it's really little pinkish and white squares. Aw well ...

It turned out that the mattress pad was much longer and yet narrower than the sheet for the backing. So I cut the extra length off, sewed the right amounts onto the side, and even had some leftover which I 'plan' on using in another idea I had. o;-p

The finished quilt :-D It qualifies as a "Green quilt" seeings how everything except the thread and yarn used on it are recycled materials. o:-> And it was my "secret project" seeings how very few people knew that I was really tackling it.
I was totally thrilled with how my 'wild idea' actually turned into a beautiful thing!!! Here it is as a finished quilt.

Seeings how I made the quilt for Analyse, I didn't think it would be right not to include some pictures of her with it ;-)
Sitting on it shortly after unwrapping it.

A couple of days later we decided to see if we could get her to pose for a picture her parents could get printed off for all of the friends and relatives. When I came home I asked Brian how to use the rapid speed on the camera!!! Man does that child move fast! But this picture shows you why I describe her as adorable!

And this one is displays her in her Easter dress in front of the quilt. Man, I need one of her hugs again!!!!!

~ ~ ~ ~ ~ ~ ~ ~ ~ ~ ~ ~ ~ ~
Special Thanks!!! :
- To Byron, Cyndi and the Lord for our grand daughter :-)
- To Robin P. - for helping me shop for / select all of the clothing for the quilt squares material. THANKS Robin! [Robin, I had every intention of visiting you at work and showing you the finished 'scheme'. But none of the guys were home the last couple of days before we left town to drive me out to you. And I have not yet been freed to drive ... I'm sorry!!!]
- To my neighbor/friend Amy M. - for the use of her clothes line and camera to take pictures of the clothing before I started cutting pieces out. And for later picking up the yarn and darning needles for me, so we could tie the quilt off. THANKS Amy!!!
- To Elizabeth B. - for technical support and encouragement. "Elizabeth, I've sewn before! I've quilted before! But would you please help my fuzzy brain remember how to find the bias in material. I can remember how to in material off of a bolt, but I'm cutting up already made clothing for this ... cutting cookies out of dough is ever so much easier! And if it doesn't come out right, you just re-roll it!!" And for getting the thread and template to use as a pattern piece for me. And for being so happy when I'd call in my progress reports. THANKS Elizabeth!!!
- To Brent - for watching the set up DVD with me and helping me figure out what I had missed in re-threading the machine. The first time I had got it perfect. But after re-threading the bobbin ... grumble .... fighting tears .... it turned out I had missed one little catch with the bobbin thread that is only the thickness of a thumbnail. Bother!!! Thanks also Brent for tieing the quilt off for me! (He even ended up using the pliers.) THANKS Brent!!!
- To Brent's girlfriend Kayla - for voluntarily taking out the long double seam when I had tried to machine quilt the layers together. All of those teeny little stitches ... my eyes were hurting so bad, and dizzy ... whew. THANKS Kayla!!!
- And to Brian - for granting me the desire of my heart and gifting me with such a wonderful new sewing machine!!! You are wonderful!!!
~ ~ ~ ~ ~ ~ ~ ~ ~ ~ ~ ~ ~ ~
I 'plan' on linking this particular posting up to:
~ "Making Your Home Sing Monday('s)", are hosted by Nan, at 'Mom's the Word (I love to hear)' (http://momstheword--livingforhim.blogspot.com/).
~ "Homemaker Mondays ... Yours, Mine & Ours", are hosted by Jen, at '11th Heaven's Homemaking Haven' (http://rtheyallyours.blogspot.com/).
~ "2nd Time Around Tuesday('s)", are hosted by Diane, at 'A Picture is Worth 1,000 words' (http://diane1876.blogspot.com/),
~ "Market Yourself Monday", are hosted by Sumo, at 'Sumo's Sweet Stuff' (http://sumossweetstuff.blogspot.com/)
~ "Trash to Treasure Tuesday('s)", are hosted by Kimm, at 'Reinvented' (http://reinventedkb.blogspot.com).
~ "Make it from Scratch", are held at 'Make it from Scratch ... Where creativity and frugality intersect'. (http://makeitfromscratch.blogspot.com/)
~ "DIY Day('s) {Do it yourself day('s)}", are hosted by Kimba, at ASPTL (A Soft Place To Land) (http://asoftplacetoland-kimba.blogspot.com/).
~ "Whatever Goes Wednesday('s), hosted by Michelle, at 'Someday Crafts'
(http://somedaycrafts.blogspot.com/)
AmmmmaZING quilt! I love the fabric combos looks very vintage! You did a GREAT job!
ReplyDeleteLooks great, Cheryl! And Analyse is adorable.
ReplyDeleteWhat a beautiful quilt, you did a great job. It's hard to believe that all those clothes made up something so pretty. And Analyse looks so pretty and her dress even goes with the quilt. Thanks for linking up.
ReplyDeleteWhat an amazing quilt - you can see the love put into it. That baby is a super cutie!
ReplyDeleteWow! Your quilt looks wonderful! And your little grandbaby is adorable :o)
ReplyDeleteI love how you put the fabrics together in the pinwheels. Your Analyse will have a beautiful, snuggley, toasty, "green" blanket :o)
Blessings & Aloha!
(I have soooo many unfinished ones that were supposed to be for our children, but at this rate...they will hopefully be completed for our grandchildren!)
all the colors combos worked out fantastic! what a beautiful quilt!
ReplyDeleteHelen
came via email -
ReplyDelete"Hi Cheryl,
Gary forwarded your quilt story to me so I wouldn't have to read it over his shoulder. I must say that it was much easier to follow by clicking on your blog!
I think the whole experience qualifies as a book. You should print it all off for Analyse, compile it into a notebook, complete with quilt-matching padded covers, and present it to her at her graduation from high school. She really needs to understand what Grandma Cheryl went through for her!!
Did you happen to keep track of your hours??
I forgot to mention: It is a beautiful work of art, and , yes, your granddaughter is adorable!!
And somebody is very good at photography.
Kathy Sto."
I just found your blog and it is great!
ReplyDeleteHow do you make you triangles for your quilt? I hae been looking for a simple way to try before I start on it. I was thinking of using a template but I am not sure, or sure of where to find a template at? Thanks Nancy M
Nancy M. - Nancy, thanks for visiting our blog!!! And thanks even more for your compliments on my quilt :-) I had cut a square plastic sheet in half horizontally to use as my 'template'. You can pick the plastic sheets up at such places as fabric stores, Micheal's, Hobby Lobby, etc. I put the 'template' on the back side of the material, traced around it, cut and sewed. I would encourage you to go for it! As well as wish you well with your endeavor!!
ReplyDeleteCheryl B.
I'm just now getting to see this, but I wanted to let you know how lovely it is. You did a great job! And for a first quilt - and a "green" one, at that? Fantastic!
ReplyDeleteI love shopping at thrift stores for sheets to use in my quilting. I couldn't afford the hobby otherwise. :)
Love! Love! Love!
ReplyDeleteLovely quilt. I have been wanting to make a quilt out of shirtings for a while now, but haven't been able to envision them like you have. I am very jealous! I am sure the quilt is very well loved.
ReplyDeleteCheers!
Rachel
What a wonderful story and a great project! All those recycled materials will continue on and be loved for many years to come! And yes, your grandchild is precious!
ReplyDelete